HOW TO JET YOUR STOCK RUCKUS CARB
So you just did your airbox delete on your Honda Ruckus. Congrats. They clean up nicely, don't they?
But now you have an issue. The darn thing just doesn't want to run right. Nobody keeps their stock airbox these days. How can they all run without a problem, but yours won't?
You jump online, and do a quick search over at Total Ruckus. You find a guy with a cool lobster claw tattoo showing how to use a pop can to restrict some of the airflow and your ruck being able to run afterwards. It's true, it does work......for a while. On my own personal ruck, I did the pop can mod and it worked pretty good. I didn't have max potential unlocked from the ruck, but it ran without the stock airbox. I was happy.
Until last summer (2014). We went out for our first ride of the year. Rode for a good part of an evening, then all of a sudden the bike wouldn't run. It would idle. But once I would give it throttle, it would die. Couldn't for the life of me figure out why. So, in frustration, the ruck got parked.
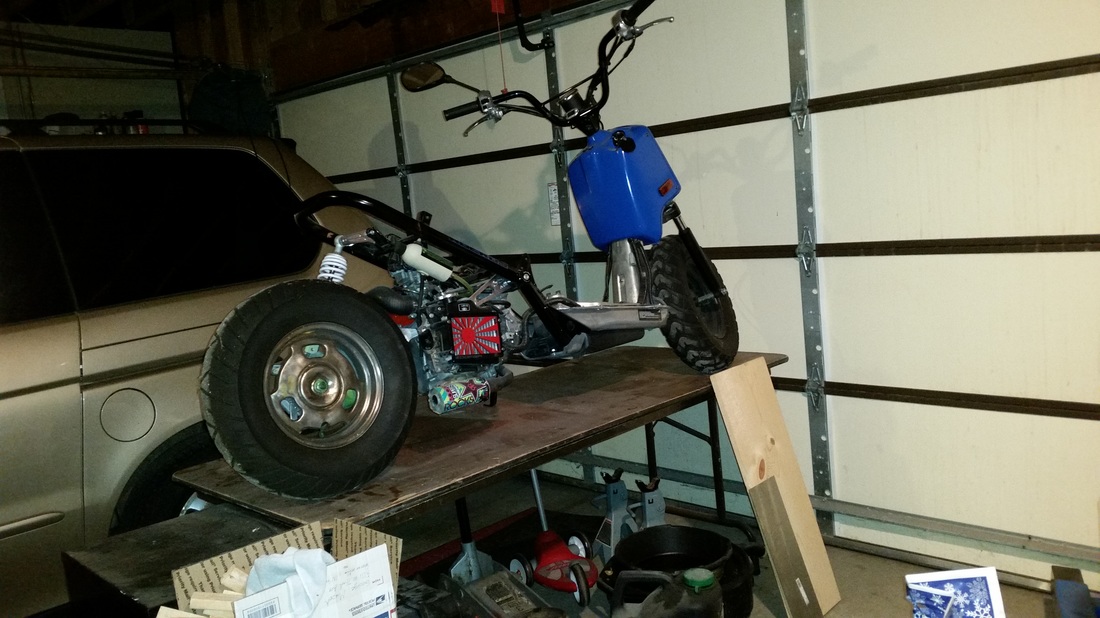
Now, here we are a whole year later. And I get her up on the operating table to see what was amiss.
But now you have an issue. The darn thing just doesn't want to run right. Nobody keeps their stock airbox these days. How can they all run without a problem, but yours won't?
You jump online, and do a quick search over at Total Ruckus. You find a guy with a cool lobster claw tattoo showing how to use a pop can to restrict some of the airflow and your ruck being able to run afterwards. It's true, it does work......for a while. On my own personal ruck, I did the pop can mod and it worked pretty good. I didn't have max potential unlocked from the ruck, but it ran without the stock airbox. I was happy.
Until last summer (2014). We went out for our first ride of the year. Rode for a good part of an evening, then all of a sudden the bike wouldn't run. It would idle. But once I would give it throttle, it would die. Couldn't for the life of me figure out why. So, in frustration, the ruck got parked.
Now, here we are a whole year later. And I get her up on the operating table to see what was amiss.
My first thought was fuel filter. The bike is an '08, and I have never changed it. Either way, it is time. For a write up on changing a fuel filter, just look under the "Write-ups" section of this website and there will be a detailed write up for you with wrench sizes and part numbers.
After changing the fuel filter, the bike didn't have much of a change. So my next step was carb. I thought, perhaps, that something had gotten in there and clogged it up. Again, the bike is an '08 so I figured a good carb cleaning wouldn't be a bad idea.
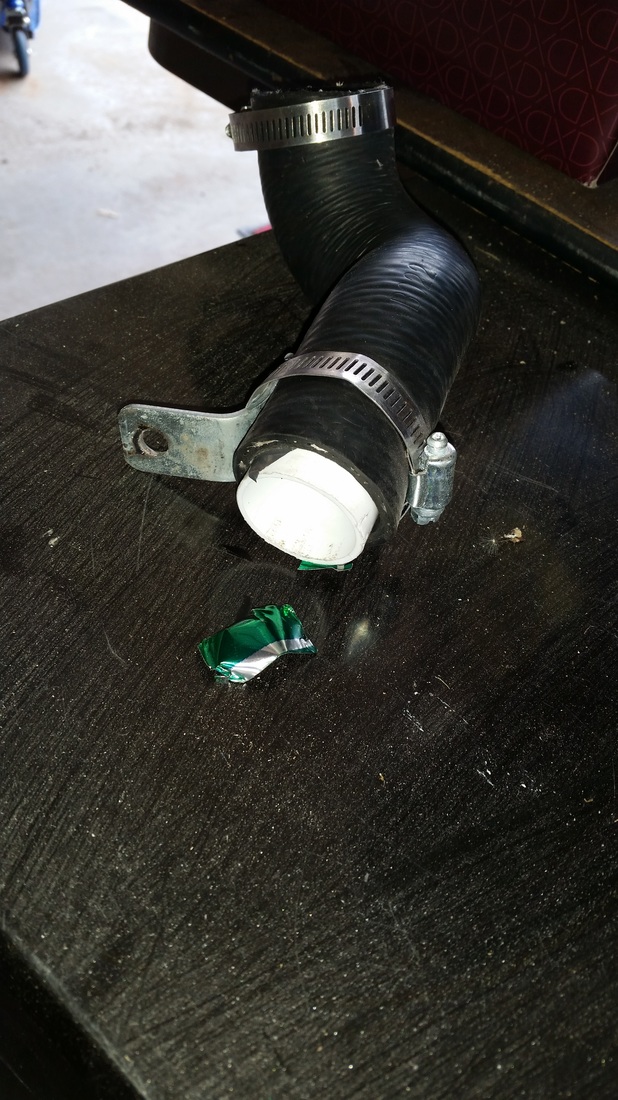
Removed my intake hose and found that the pop can had been SUCKED INTO THE INTAKE!
After changing the fuel filter, the bike didn't have much of a change. So my next step was carb. I thought, perhaps, that something had gotten in there and clogged it up. Again, the bike is an '08 so I figured a good carb cleaning wouldn't be a bad idea.
Removed my intake hose and found that the pop can had been SUCKED INTO THE INTAKE!
Avoid doing the "pop can mod" at all costs. It will gain you nothing. Read the rest of this write up, and properly jet your carb and you will be happy you did.
First thing is first. Ordering jets. Jump on a website like Jetsrus.com and order jets. But wait.......which ones do I want? That all depends on your bike. What mods do you already have done? My personal bike has airbox delete, NCY CDI, and a Briggs exhaust. These are popular, mild, beginner mods. Let's just simplify by saying if you have deleted your airbox, you will need to jet. If you've also added exhaust, you will need to jet. This write up is focusing on a ruck that has a deleted airbox, and an exhaust.
You'll see on the jetsrus.com website that there are many, many options to choose from. You should know at this point that your ruckus comes stock with a "35" Pilot Jet, and a "75" Main Jet. You'll find things on line that state it like; 35/75......or, 35 slow 75 main......or, 35P 75M. All are saying the same thing.
The carb on your ruck is a Keihin Carb. The jets you want can be found under Honda Ruckus NPS50. You'll notice a lot of different options. The larger the number, the larger the jet. Remember your stock settings.....35/75. During my research I found that the most common (remember every ruck is different) jets to go up to is a 38/78 (with the mods mentioned above). So that's a 38 pilot, 78 main. I suggest when you order, you order a couple different ones. Some online shops offer "kits," but 99% of the time they are sold out. So just order them on your own and get what you will need. My first order I placed, I got the 38 & 40 pilot jets, and 78,80,82 main jets. This way, I would have the ability to "tune" my carb if need be. Don't automatically assume that you will need the "82" jet. It doesn't work that way. The best bet is to start with the first step up which is the 38/78. This is where my ruck was happiest, but again......all rucks are different.
So, you've ordered your jets from the jetsrus.com website and you're ready to begin.
For tools you'll need:
12mm open end wrench
12mm socket comes in handy too (mainly for seat bolts)
a couple different size phillips screw drivers
a couple different size flathead screw drivers
needle nose pliers
some rags
vise grips (3 total if you have them) (not necessity, but nice to have!)
drip pan (there is some gas in the carb, but not much)
First order of business for me was unhooking my taillight. Mine is the R6 taillight mounted to the seat. Next, I take my 12mm socket and remove the bolts on the seat frame:
With that out of the way, now you can see all of the things that make your ruck tick (that is of course if you've deleted your floor pan as well). If you still have your stock floor pan, please refer to the "Write-up" section as to how to remove that to gain access to your carb.
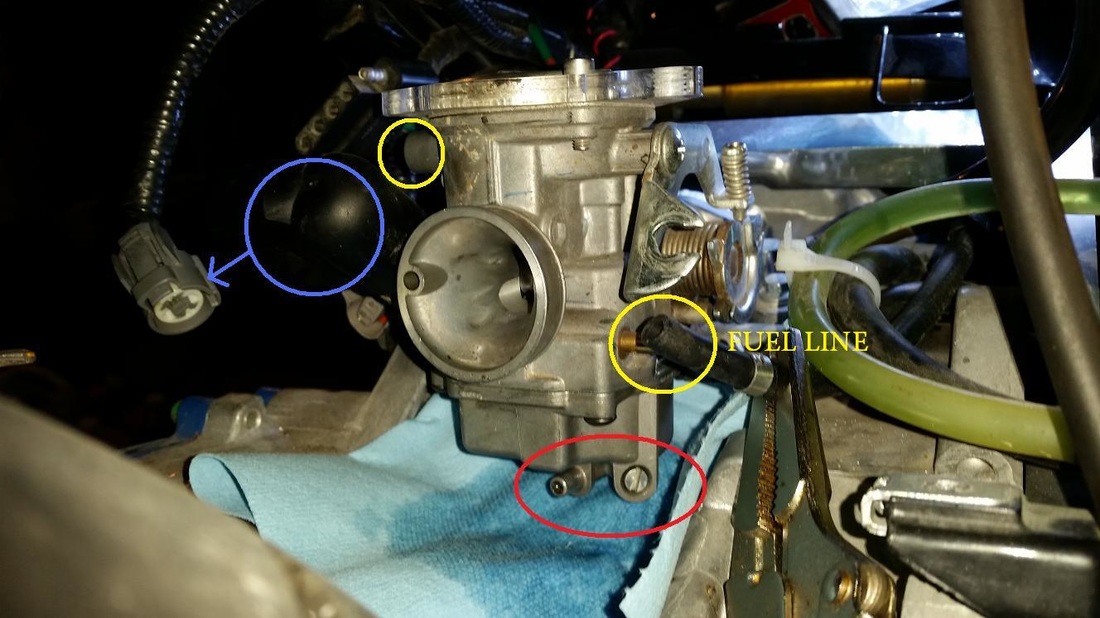
My ruck has the PCV valve relocated to the top of the carb. The next picture shows a "top-down" view with the seat removed. The YELLOW circles are hoses and filters that need to be removed (the filters will be in place after you do your airbox delete). The hose runs from the engine to the PCV. Just unhook this at the PCV. The small filter goes where the bottom right circle is. Take that off. And at the very top is another filter mounted to the PCV. Take that off too. **NOTE** the two small filters on the PCV don't need to come off for this, but it just helps to get things out of the way while you're working in there.**
Now, there is an electrical plug on the PCV, and two on the carb. Unplug all three of those. Those are in the pictures with BLUE circles around them.
At this point, if you have them, take one of your vise grips and squeeze the fuel line. Leave yourself enough room to get the hose clamp off, but you don't want that line just gushing gas out of it while you're working. This hose might be a little worn out too. Mine was on a 2008 Ruckus. So to replace it I got some 5/16" fuel hose (regular vacuum line doesn't like GAS going through it) and replaced it. THIS LINE IS MARKED IN ONE OF THE PICTURES BELOW AS "FUEL LINE."
Good job. Now we won't cover everything with gas. Next up is your throttle cable. It comes from the left side of the ruck (as if you're sitting on it), loops around behind the carb, and hooks up on the right side of the carb. Grab your 12mm open end wrench and loosen the two nuts on the throttle cable. Just back them both completely off. One will just stop at the top of the threads, the other one will thread off and hang loose on the cable itself. Now that you have these loosened, go ahead and roll that half circle looking thing the cable goes to, it will only rotate one way. Once you get some slack in the line, take the cable out of the little groove it's in in that half circle thing, rotate the "barrel" on the end of the cable, and slide it out towards the side of the ruck. Now that the cable is unhooked from the carb, you just need to feed the cable through it's little bracket so you can tuck it out of your way for now.
Grab a phillips head screw driver and loosen the bolts on the adapter that goes from the carb to the engine. There are two screws circled in PINK. I have found it easy to just loosen the one closest to the carb. The other one doesn't need to come off for any reason during this procedure.
That carb has been clamped in there for a while. Use caution while trying to remove the carb from the hose. You could damage the hose.
Once the carb is free from that big hose, you only have a couple more things to contend with. That would be your coolant lines. These are the hoses that run under that intake hose. One comes from the right side of the ruck (as if you were sitting on it), and appears to go clear through to the left side of the ruck and into another hose. Well, that's exactly what it does. For the first time around, i'm going to say go ahead and remove these hoses. It's a good time to inspect and replace if needed. **NOTE** before removing these hoses, I used my other two vise grips to make sure I didn't have coolant come gushing out at me.**
Once you've unhooked these coolant lines (these are marked with YELLOW circles on the picture of the carb completely removed from the ruck at the bottom of the picture), you are free to take your carb out completely and get it where you can work on it a little bit better.
Pretty straight forward so far. Rip and tear, and get that thing out of there! But wait, this little carb is still full of gas in it's float bowl. We need to get rid of that before we move on. Make sure you have the right sized flathead screwdriver, and loosen the screw circled in RED on the picture below. Have that hose barb placed over a drip pan, or something to catch the gas that will come gushing out.
Now that you have the gas all drained out and disposed of properly in your neighbor's petunias, go ahead and flip the carb upside down. Now, you will see three phillips head screws. These were created by the devil himself. They strip out VERY easily. So, make sure you have the correct size phillips screw driver, and remove these three screws. Exercise caution! They are very soft and will most likely strip out. If they do, don't be frightened. We can fix this. The easiest solution is a Dremel tool. Simply cut a single slit across the top of the screw so you can use a flathead to get it out of there. Worst case scenario, you might need a reverse drill bit, or a screw extractor bit. Let's hope it doesn't come to that. You've been warned, so don't let the devil have his fun.
Once those little bastards are out, go to your local hardware store and get Allen head replacements for those little screws. You'll thank me later!
Now that you are done with that BS, go ahead and remove the float bowl to finally see your prize!
Once those little bastards are out, go to your local hardware store and get Allen head replacements for those little screws. You'll thank me later!
Now that you are done with that BS, go ahead and remove the float bowl to finally see your prize!
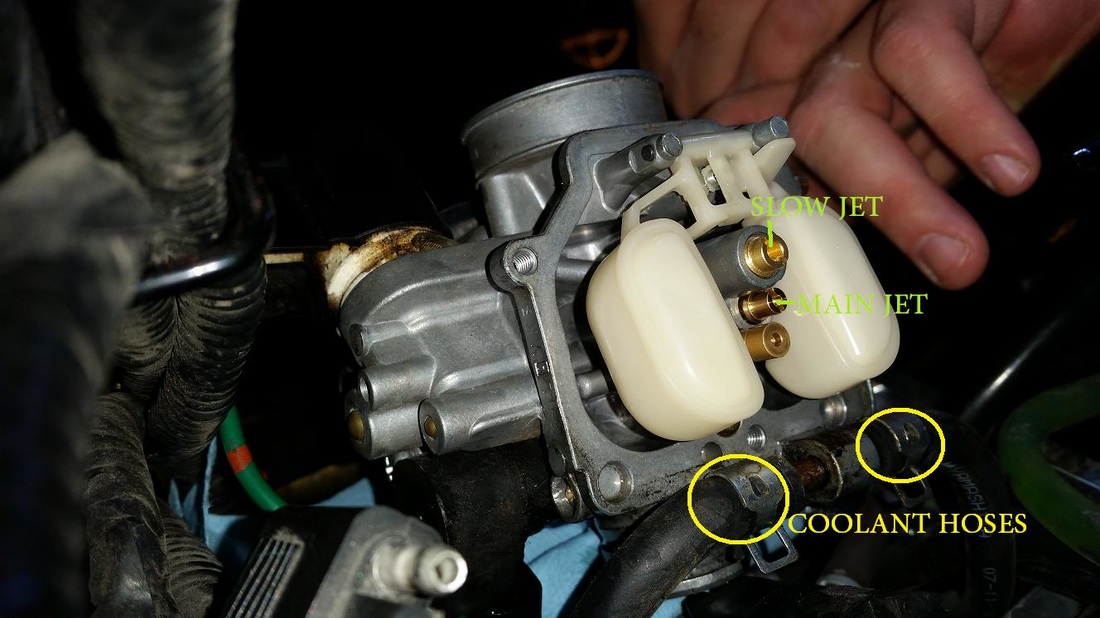
As the picture shows, the upper one is the "pilot jet" or "slow jet." The bottom one is the "main jet." Also shown in this picture are the coolant hoses. They are still attached in this picture for reference.
Now that you've finally found these little buggers, don't let them trap you! Once again, find the PERFECT sized flathead screwdriver to remove them. If you have the wrong size you CAN AND WILL strip these out as well. Exercise caution here too.
Once you have them out, put in your next step up for jets. If this is your first time, I highly recommend starting with a 38/78 mix. You may not have to go any further than that. But putting it all back together again and riding your ruck will tell the tale.
Now, you have your bigger jets in. Inspect the o-ring on the float bowl for tears or spots where it might be "crushed." If it is, order one from Honda and replace it. **NOTE** The part number for the HONDA part is: "160-10-GET-003"** If not, I recommend just dabbing your finger in a little motor oil, running it around the o-ring, and putting the float bowl cover back on the carb. Use your fancy new allen head screws to bolt it back down. Once you've done that, take those devil screws and throw them in the trash. Evil little things.
Take the carb back to the ruck. Slide it back into it's little hidey hole on top of the engine. Installation is reverse of removal. Hook up your coolant hoses first. These should only be long enough to go on one way, so you shouldn't get them mixed up. If you do, the hose that comes from the radiator side goes to that same side of the carb. The hose that comes from the spark plug side goes to that same side. Don't forget to remove your vise grips if you used them.
Now slide the carb into the intake hose that goes to the engine. Use your phillips screwdriver to tighten that back up.
Next is the throttle cable. Remember how that came off? That little "barrel" on the end needs to go into that little half wheel thing. Rotate the half wheel thing the only direction it will rotate. Slide that "barrel" into the half wheel, and then tuck the cable into the channel on the half wheel. Let the half wheel back to it's resting spot.
Feed the throttle cable back through it's bracket, and then thread the two 12mm nuts CLOSE to back where they belong. What you want to do is set them so that the little half wheel is resting on the screw above it. That is your idle screw. If you don't set the cable right now, your idle will not be right when it's time to start the ruck.
Go ahead and put your fuel line back on. Again, be sure to remove your vise grips if you used one.
Plug in all of your plugs at this point, and re-connect your hoses. Once everything is hooked up and you have double checked, go ahead and bolt your seat back on.
Now, when you get everything back on, go ahead and start the ruck. It will take a little bit of cranking because you drained all of the gas out of the carb, remember? Now you have to get more gas back into it before it will even THINK about starting.
Let it warm up nice and good. Take it for a spin. I'm not talking just down your driveway, I mean take it out for a top speed run. You want that engine good and WARM to make sure everything is right.
Now, if you're lucky, she will run like a champ. If that's the case, you're done! Congrats!!!
If not, then you need to let her cool down (those fluids are going to be HOT HOT HOT), and do the entire procedure again. Once you get the ruck to run good, then you can fine tune by trimming your intake, shimming your needle, roller weights, etc, etc......those are all covered in other "write-ups" on this site.
